Sometimes, voice is simpler. Certainly when you’re in a mobile scenario, getting some audio recorded can be extremely efficient if you’re in a position to be able to do it. Most smartphones give you the ability to record audio but in my experience, you get poor quality, a fixed mic and no way to post-process. If you want to broadcast live, there are very few ways to do it. Using a MID or ultra mobile PC gives you the option to work in a higher quality and more flexible way.
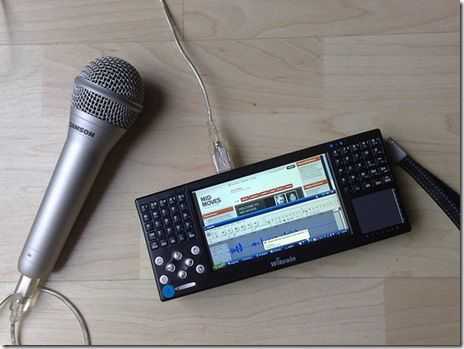
I did some tests with an Intel Atom based Wibrain device recently and wanted to talk in a bit more detail about how I did some quick audio podcasts and broadcasts while staying mobile but still keeping the quality high and remaining efficient.
The key to being efficient in this case was being able to use processes, knowledge, hardware and software that I use in a normal desktop environment and to use a posting process that automates as much as possible.
Hardware
In terms of hardware, I have been using the Samson Q1U mic. (More info at UMPCPortal.)
The Samsung has advantages and disadvantages. The sound quality is excellent for voice and it’s a plug and play operation under windows. No drivers are required as it simply appears as a new sound device with one mic channel. The problem is that it doesn’t offer a playback channel so you can not monitor what you’re recording. In normal situations this doesn’t matter but if you’re into studio-based work, you’ll instantly see the limitation. The second problem is that it’s heavy. While nice to hold, it adds a lot of weight to the mobile kit. I haven’t tested it under Linux yet.
An alternative to the USB mic is an analogue mic. The two problems with this are. 1) good quality handheld vocal mics always appears to require additional power to the mic either through battery or phantom power which limits mobility. 2) Internal electronic interference can affect quality. Generally, I use an analogue mic with a headset where the mic can be kept close to the mouth (and therefore, doesn’t require an additional power) but for interview situations, or places where you’d rather look like a reporter than a geek, the handheld mic is a must!
Software.
Audacity, the freeware audio recording tool is almost the de-facto windows-based solution here. It’s not exactly one-touch but it’s extremely flexible. By adding in freeware mp3 codecs (LAME) its very simple to output the required MP3. Post processing and adding pre or post-roll is also easy. Find Audacity here. Again, I haven’t done much with Linux but audacity is available for this platform.
Process.
The process is important and as-yet I haven’t settled on the best way to get from mp3 on the hard disk to listenable podcast on a website. I’m close to making a final decision though. Here are the two methods I’m trying out.
1 – Upload to a Mevio show.
Mevio.com offers free hosting and tools for podcasters. I’ve been using it for UMPCPortal.com podcasts for a while and have been extremely happy with it. They offer an embedded player and some nice export and embed tools but in order to integrate the mp3 into your post, you still need to make a blog entry and link to the mp3 source which is a second step. The RSS from Mevio is well formatted but integrating this onto your website via a ‘widget’ means you have to wait for updates which can take anything from 5 minutes to an hour! For near-live podcasting that can be a major problem.
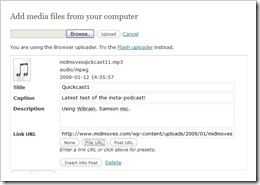
Using wordpress, it’s easy to add media to a post using the built in tools (click image right.) It keeps it local and it keeps it within your own brand which is sometimes nice to have. It also means that you don’t have to rely on 3rd-party sites to stay in business! The downside to this method is that you end up with a simple link to your MP3 on the post and the end user has to download or run streaming software to get it working. The fix for this is a plugin for the wordpress blogging software we’re using that enables the Yahoo embedded media player. This player will find any links to MP3 files and add a pop-up player to them with requires no work at all on per-post basis. You can find the plugin here. There are also manual ways to enable this Yahoo tool so check out their website for details. For an example of it in use, see this post which I created using the hardware, software and method detailed here.
Summary.
- I’m currently working with the second of the two process here so the start-to-finish process goes something like this.
- Boot-up windows (usually from standby or hibernate)
- Plug in Samson
- Start audacity
- Hit the record button and record the podcast
- Stop recording and check audio
- Post process using compressor and add pre/post roll if necessary
- Export to MP3 using the LAME dll through Audacity. (i’ll use 96kbs I think. Maybe less.)
- Start up the browser and open the ‘new post’ bookmark for MIDMoves.
- Add text and set correct categories (categories used to generate a podcast-specific RSS feed)
- Upload mp3 into the WordPress media library and link into post.
- Publish post
The post will appear immediately on the site, the MP3 will be shown with a small ‘play’ button and the RSS feed will update automatically for those following via that method.
If you have any tips or use a different method yourself (i’m interested to see how Ewan does it as he’s had more experience with this type of this than I have) please let us know in the comments.


>>Audacity, the freeware audio recording tool is almost the de-facto windows-based solution here. It’s not exactly one-touch but it’s extremely flexible.
hi Steve/Chippy
I am not a podcaster but missed “voice-activated” recording – less buttons to press – in Audacity the last time I sownloaded it. Instead I usse the free basic version of WavePad:
http://www.nch.com.au/wavepad/index.html
New article: How I'm going to do my Mobile Podcasting on the MIDMoves tour. http://bit.ly/bwqIxd