 In a series of articles over at UMPCPortal last year I looked at ultra mobile video editing solutions ranging from iPhone through netbook to Core i5-based ultra-thin setups. All solutions were put together with YouTube production in mind with cost, weight and speed being the three key ingredients.
Since completing the series I’ve stuck with a combination of lightweight laptop, camera and software that has worked well for speed, mobility and flexibility and recently, I upgraded from a hard-disk based Core i3-based system to an Ultrabook. At the same time I upgraded the software and in combination with a very flexible camera solution, the set-up is worth worth writing about. If you’re looking for a relatively low-cost YouTube production system should read this and the series of articles over at UMPCPortal
This article is also linked to a presentation I did with Nicole Scott at the VideoCamp in Duesseldorf, Germany
Features and capabilities of the ultra mobile video editing solution.
- Low Cost. Complete solution including laptop, software and camera cost less than 1500 Euros.
- Weight. around 1.5KG
- Source video is 1080p. Camera capable of self-video.
- Simple editing (cut,fade,title, pre-roll, post-roll) results in 2x-3X real time rendering to 720p
- Fast upload to YouTube
The Tools
Toshiba Z830 Ultrabook
 The Toshiba Z830 / Z835 comes in different versions and I’ve tested two of them. The first, a 1.6Ghz version with Core i5 – 2467M and Turbo 2.0 to 2.3Ghz and the second, the same build but with a Core i5 2557M at 1.7Ghz but with a Turbo 2.0 boost to 2.7Ghz. Combined with the fast SSD, this small upgrade is making a big difference. The SSD is not the fastest in terms of pure read and write speeds but it does an excellent job with small block reads and writes – just the job for video editing. The screen is a good matt screen and there’s an SDXC card slot, USB3.0 (great for quick back-up to external storage) and a backlit keyboard for low-light working. The Toshiba does have a buzzy fan that is noticeable in quiet environments but you can be confident that it’s doing a good job and this is very important for getting the most out of the ‘Turbo 2.0’ feature on the chipset. Importantly, the HD3000 graphics unit includes a hardware video decoder and encoder (known as Intel Quick Sync Video) that can be used to help the editing process and will encode popular formats such as WMV and H.264 in impressively quick times. The icing on the cake? It weighs 1.12KG, under 40oz.
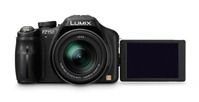
 Panasonic Lumix FZ150 consumer-level camera
This ‘bridge’ camera has 12MP, 24x Zoom, pixel oversampling, hot-shoe, rotating display, full HD (or 720p) in MPEG4 or AVCHD, 50 or 25fps, external mic port, HDMI-out, SDXC card support and some impressive stabilization and low-light performance for a compact-size sensor. Weight is just over 500gm. Price around €420. In terms of low-light sensitivity it’s not in the DSLR class but it’s good enough for most situations where news, event and product blogging is concerned. The battery life is excellent.
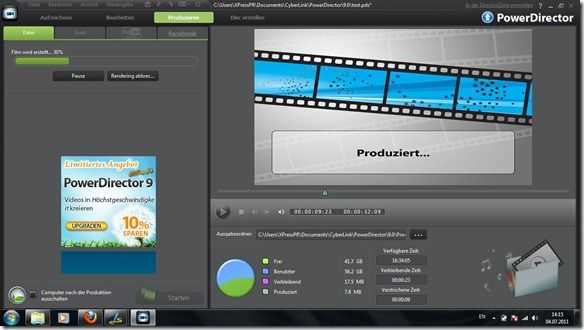
Cyberlink PowerDirector 10 Editing Software
Over the last 6 years I’ve seen consistent support from Cyberlink for low-level video hardware. The recent AMD Fusion platform is well supported and the same is true here with the Intel Quick Sync Video technology which provides a hardware and software-optimised video processing library.
Over the last 6 months of using PowerDiretor (v9 and 10) it has proved rock solid on the Intel and AMD Fusion platforms I’ve used. Startup time on the Toshiba Z830 Ultrabook is a mere 5 seconds and importantly, it has the ability to use Intel Quick Sync video for accelerating the render process. There’s also a flexible profile editing system and a good community of users.
I use PowerDirector 10 with shadow files turned off (the video decoding is done in hardware and doesn’t need shadow files for even 1080p content that I’ve tried) and in a 25fps mode. This is due to my camera only supporting 25 of 50fps recording. (30fps would be ideal but 25fps seems to be acceptable to all YouTube viewers)
I have a tailored profile for high-speed rendering and YouTube upload.
Other hardware and software
Nokia N8 cameraphone
A Symbian-based phone with high quality 12Mp / 720p camera, Xenon flash and 720 video capability. Long battery life. The N8 is used as phone, SMS, calendar reminder and for quick photos (including evening/people/party) that I’ll put up on Twitter, Facebook and other channels. I tend to use it for photos that I take around an event or session. Low-light performance is amazing and the Xenon flash is second-to-none in terms of pocketable, connected cameras. It does a good job of 720p videos and has a great built-in array mic. The headset is surprisingly good as a label mic.
Android Tablet / Phone
I’m hopping about between a Galaxy Tab 7 (2010 version) and a Sony Xperia Arc (2011) at the moment. The key feature of the Android component is that it allows me to manage YouTube videos and very simply share and track them among social networks. The Galaxy Tab 7 is perfect for 1-2 paragraph of test input, the Sony Xperia is great for taking daylight photos and sharing them online. Both Android devices are, importantly, used as 3G hotspots.
The Process
Ultra mobile video is all about being in the right place for fast-breaking events and then having the ability to do a good, quick one-man job of editing and publishing the content (through video, image and text) of those events. Through the use of a flexible PC-based editor and renderer the user can choose the quality needed to allow a quick upload process. Video journalists know that minutes saved when uploading videos over a 3G links can mean all the difference. YouTube partners that are uploading event videos to will also get an advantage by being first. That’s the aim of the Ultra Mobile video editing solution.
If you want to skip the text here, I’ve wrapped it all up in a video demo that is shown below. Unfortauntely I had to record it on an older cam so it’s only 4:3. The final edit is shown below and is a 3.5Mbps 720p 25fps upload.
In the work I do as a tech reporter and YouTube partner (meaning YouTube is an important revenue stream for me) I use the Panasonic FZ150 in 25fps 1080p mode which gives me a nice balance of detail without having too-fast a shutter speed. Low-light performance at 50fps on the FZ150 requires lighting conditions that are rare indoors. I tend to use the built-in mic on the camera although I have been experimenting with cabled lapel mics. When one is self-recording though, the built-in mics are usually all that are needed. I don’t use any additional lighting although the hot-shoe on the FZ150 would allow me to mount a LED lamp if needed. So far, I haven’t needed it. I understand the importance of having a face in the video and having a couple of edits or cut-aways to keep the video more active. I tend to do a one shot style video but am not experimenting with multiple segments with different camera positions instead of one long take. Introducing with an arm-length shot to my face is possible with the 25mm wide-angle zoom on the FZ150. I am now experimenting with an outro to the face too.
The FZ150 gives the possibility to take images while recording video which can be very useful if you’re recording an event that’s never going to happen again. Otherwise I’ll take a set of images after recording the video. After that, it’s SD card out of the camera and directly into the Toshiba Z830 where ‘autoplay’ is set to import images and videos into Windows Live Photo Gallery. I find this a fast way to access and organise clips and videos. PowerDirector 10 is started via a link to a temple project I have on my desktop. Pre-roll, post-roll, title template and project settings are already set-up and this saves a lot of time. Videos are dragged into PowerDirector 10 where they then appear in the media library and are dragged onto the timeline.
Individual clips may be edited down to size but I tend to try and keep the video segments as tight as possible so they don’t need any editing.
After checking any clips I think might have needed attention, I do a group cross-fade on all the scenes and add the title. I then choose a render process that matches the scenario. A huge new exclusive amongst other video bloggers means sacrificing some quality to get the render and upload done as soon as possible. This might mean a 2Mbps H.264 output. In most cases I’ll use a 3.5Mbps H.264 bitrate. (Always 720p. I’m not convinced that my audience needs 1080p although there are some rumors that 1080p content might get preference for delivery to TVs in the future.
When the render is complete I use the YouTube web page to upload the file, adding title, description and, very very importantly, really well-refined tags. I also enable ads on the videos immediately. I find that YouTube is ready to publish the video just seconds after it has uploaded with this process.
Tutorial Video (The Making Of)
The final edit.
In the videos above you’ll see ‘the making of’ which really takes just 10 minutes (there’s a cut on the video – the old cam I was using only records about 7 minutes on one shot!) and then the 720p output video. It’s not perfect but I think it’s more than acceptable. Of course, your feedback is more than welcome. Do you think this process could be refined. Do you think the video quality and editing needs to be a lot better? Do I need to improve my on-cam skills? (yes!) Add your comments below.


Hi Chippy, nice tutorial, good video quality. 1080p is the current broadcast standart for tv productions. But if you have a good story, you can record it with Super 8 (like i have done in a documentary). And this is a perfect bridge to my recommendation: the swiss army knife for videos converting is the freeware “super” from erightsoft. You can easy convert nearly every video and audio format into another. And it have fixed settings for most of the mobile devices and cell phones formats. So it is the perfect tool for content produers like you.
Best regards from Cologne
TL
I use Cyberlink Media Espresso on the Ultrabook as it supports the video encoding hardware and accelerates most conversions many times faster than a software (CPU-only) solution.
Well done movie and article. Do you travel with both N8 and Sony ARC? how do you move the movie from Symbian to Android? Looks like double the work. As far as I know the N8 allows to upload the movies to YouTube.
Best regards from Tel Aviv, Israel.
Isaac
Isaac.
I am now using the Panasonic (used in the video) nearly 100% of the time for my YouTube videos. The Sony Arc (or any Android device) is only used for social networking an promotion of videos and articles. The Nokia N8 is used for photos and is a back-up video device. Videos from the N8 can be uploaded directly but I often connect a USB cable and transfer them to an Android device for upload to YouTube as the YouTube upload experience on the N8 wasn’t very good. (There are new apps on the N8 that have improved this though – I am reasy to use them when the time comes that I only have the N8 with me.)
I feel that is one of the so much vital info for me. And i am satisfied reading your I feel that is one of the so much vital info for me. And i am satisfied reading your article. But want to observation on few normal things, The website style is ideal, the articles is actually great But want to observation on few normal things, The website style is ideal, the articles is actually great